Using JPEG format? Set the white balance first.

If you are photographing a wedding, you tend to shoot more shots than other situations.

If using RAW format, you need not bother about the white balance (you can change it later with Photoshop). However, RAW will take extra space on your memory card.

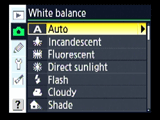
Therefore, photographers tend to use the Fine JPEG format (allowing them to take more photos). But you need to pay attention to white balance setting, otherwise your photo will appear too blue or too yellow.

No need to worry, including the white balance setting is quite easy. Go to the white balance menu, select Incandescent if the shooting is done in a standard reception hall, if daylight outdoors. If using flash, use flash on the white balance settings.

Hopefully these tips useful.

Backup your photo

Weddings only happen once. You can not repeat the moment. Make sure, as a photographer backing up your shots. When memory card is full, replace it with a blank, then backup to the hard drive.


There are some good backup device, example, Epson P-6000 and P-7000. Simply attach the memory card, then immediately backup by pressing the copy button.

It is advisable to have backup of your backup. (it seems paranoid, better safe then sorry..) Remember, backup! What would you say if your memory card is damaged and lost all their wedding photos?

Camera position on wedding photography

When you take a family photo (formal) or wedding photo, high-low settings the camera is very important. Because if the camera position is incorrect, the subject's body will look distorted. Here are some guidelines:


Shooting the entire body in a standing position
position the camera at waist level, point the lens straight, do not overlook the subject's face

Shooting 7/8 (calf and above)
position the camera parallel to the chest of the subject, point the lens straight.

Shooting head and shoulders
position the camera eye level or slightly above the subject's eyes.

How to avoid eye blink

If you're photographing a group of people (4 people more), almost certainly, one or more photographed in a state of eyes closed.

This is common in wedding photography. Try the following tips when you are ready to take picture, ask them to close their eyes, then on the count of three have them opened his eyes and smiled. And provide an additional count, then take the picture.

The right time for taking flowers picture


  1. A cloudy afternoon. When the clouds blocked the sun, the shadow will appear soft, the rich colors of the flowers will not be lost by the sun heat.
  2. Right after the rain, don't forget to take a picture of rain drops on the flowers. And you'll be amaze, yes my picture will feel like a pro.
  3. When the sun beating down, the right time is in the morning or late afternoon. Use a long zoom lens, set your position so the light comes from behind the flowers and get spectacular lighting but still under control.

No tripod? Try this trick

Low light conditions, and no tripod next to you. Try the following tips, use Continues shooting or burst mode. With a barrage of camera shots, more possibility to get sharp images.

In addition, try to find a place for you to lean on. Make your body as a tripod. Observe the environment, is there any place, or a tool that can be used as a tripod, then snap in self timer mode.


There is a professional photographer (Joel Lipovetsky) which has a unique trick by wrapping the camera strap in the elbow.

Sharpen your image digitally

Here a short tutorial how to sharpen your photo using Photoshop, without creating a cycle of halo or color artifacts that may occur when the sharpened photo. Next the steps:


  1. Open the image, and select menu filter-sharpen-unsharp mask. Use a configuration such as the note below.
  2. After that, directly to the Edit menu and choose Fade Unsharp Mask
  3. Change the setting Normal to Luminosity.

Unsharp Mask settings
  • Human: Amount 150%, Radius 1, Threshold 10
  • Landscape or Town: Amount 65%, Radius 3, Threshold 2
  • Daily activities: Amount 85%, Radius 1, Threshold 4

Yyou can experiment, starting with setting the rules above. And you will amaze with the result. Happy photshoping.

Sharpen your image digitally

Here a short tutorial how to sharpen your photo using Photoshop, without creating a cycle of halo or color artifacts that may occur when the sharpened photo. Next the steps:

  1. Open the image, and select menu filter-sharpen-unsharp mask. Use a configuration such as the note below.
  2. After that, directly to the Edit menu and choose Fade Unsharp Mask
  3. Change the setting Normal to Luminosity.


Unsharp Mask settings

  • Human: Amount 150%, Radius 1, Threshold 10
  • Landscape or Town: Amount 65%, Radius 3, Threshold 2
  • Daily activities: Amount 85%, Radius 1, Threshold 4

Yyou can experiment, starting with setting the rules above. And you will amaze with the result. Happy photshoping.

Lower ISO for sharpest image

Use a low ISO as possible. When you take pictures using a tripod with a low-light situations, do not increase ISO value. Try to stick with a low ISO (ISO 200, 100 or 50) to obtain the sharpest images and clean.

But if you do not use a tripod, there is no alternative but to raise the ISO.

TIPS: Set the camera on Shutter Priority and choose a speed that matches or exceeds your lens focal length (eg, 180mm means you'll be shooting at a speed of 1/200 sec)

Good lenses for sharp image

Good lenses will provide a major influence on image sharpness. And a good lens will be followed at a great price. :)

That need attention, care of your lenses, such as storing the dry box, using a UV filter or lens hood.

24-70mm lens from Canon is one example TACK SHARP lens

Take photos on sharpest diaphragm

Take photos on the sweet spot, which is the sharpest aperture of your lens. Typically, the sharpest aperture stop is two smaller than the width of the lens aperture (f-stop higher 2 stop). Examples, the sharpest aperture of lenses f/2.8 at f/5.6 and f/8. Keep in mind, this does not apply in all types of lenses.

These tips are not intended to bind you have to shoot at a particular aperture. If you want to get the DOF of course, the diaphragm should be adjusted as needed.

Turn off VR or IS

Lens feature Vibration Reduction (VR by Nikon) and Image Stabilization (IS by Canon) is a very nice feature. And can save you when no tripod on your side.

However, when tripod on your side, turn off this feature, and you'll get sharper images. In non-technical, VR or IS lens, will look for vibrations and when they are not found, this feature will keep searching, even cause a small vibration that cause you get less sharp image.

Mirror Lockup


Exposure Delay Mode (Nikon) or Mirror Lockup (canon) will lock the camera into the mirror movement, so when you push the shutter, mirror will not move until you find the right Exposure. With limitation of movement, then the images are sharper and clearer will be obtained.


Scott said, these tips are as important as using a tripod, so, hurry and look for this feature, so that shots are crisp and clear like a professional photographer.

Noteworthy, in canon camera, after this feature is active. When taking photos, keep pressing the shutter button 2 times. The first to lift the mirror, the second to take a picture. As with the Nikon, just press it once. Sounds pretty complicated. But you already perilously close to TACK SHARP like a professional photographer.

Is this tips working for every situation? Please check out other tips on Mirror Lockup when shooting HDR.

Cable Release

is cable attached to a digital camera with shutter button end. By pressing the shutter button on the cable release, you can take pictures without touching the camera.

Along with the development of technology, we can find wireless version, the price is decent, but more practical use than the cable release.

Believe it or not, when you press the shutter, even though the camera is mounted on a tripod at best, still There is a slight shock. Well, this will reduce the sharpness of the photo. With a cable release, this effect can be reduced.

If you miss a cable release or no budget to buy it, there are other tips from Scott. Use the self timer of the camera. Set the self timer as needed, which is quite stable when the camera back after you press the shutter button.

Tripod and ballhead for Sharp Image


To produce a sharp image, the most important tips is using a tripod.

It distinguishes between pro with an amateur, even in the daytime too, pro using a tripod. Yes, bring a tripod "pretty" inconvenient, but, little things like this that will make you a sharper image.

Advice from Scott Kelby budget based on the sequence
  • Manfrotto oleh bogen imaging 190XDB
  • Manfrotto oleh bogen imaging 055CXPRO3
  • Gitzo GT3541L


When buying a pro tripod, usually you just get his legs alone. wow. already expensive just to the feet as well. So we need to buy a tripod head, it is advisable to use a ballhead types, just with one button, you can move to positions of the desired camera.

So keep in mind, looking for ballhead that is able to support the weight of the camera and lens. Because a great ballhead, capable of holding the camera up to it from slipping.

Advice from Scott Kelby budget based on the sequence
  • Manfrotto oleh bogen imaging 322RC2
  • Realy Right Stuff BH-40
  • Realy Right Stuff BH-55 (cocok untuk lensa panjang)

Tips to produce a Sharp Photo

A sharp Photos as it is known with TACK SHARP which stands for Technically Accurate Cibachrome Kelvin Addons (referring to the color temperature of light in the photo) and Shutter Hyperfocal At Addons Refracted polarization. Sounds complicated.

At the bottom line is to reduce camera shake when you take a photo. And it can be tricked with tips that are packed by Scott Kelby as follows: